There’s a reason eyeliner remains one of the most-searched beauty topics year after year it’s also one of the most universally intimidating. A single wobbly line, an uneven wing, or liner that smudges by lunchtime can turn a five-minute routine into a frustrating mess. The good news: how to apply eyeliner correctly is entirely learnable, and the secret to flawless eyeliner application is tailoring your technique to complement your eye shape rather than chasing a single “perfect” method that works for everyone.
Before You Start: Choosing the Right Eyeliner Type
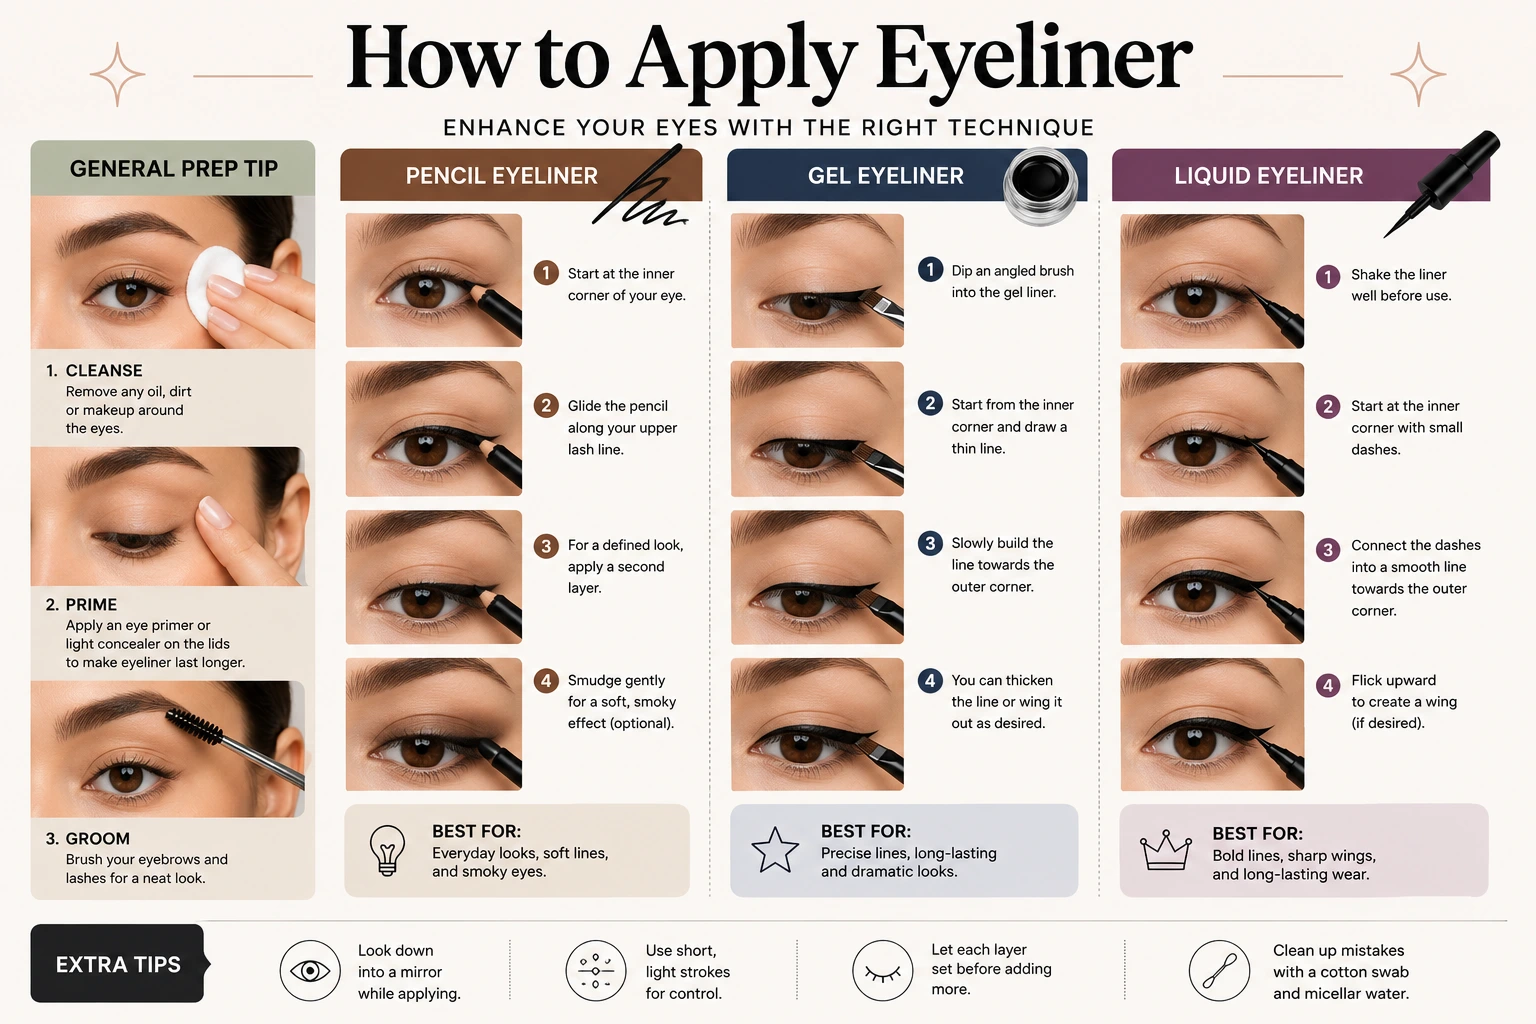
Before diving into technique, it helps to understand the basic types of eyeliner available, since the right product makes the entire process significantly easier.
Pencil eyeliner is the most beginner-friendly option. Pencils are beginner-friendly, while liquids and gels offer sharper results the softer texture of a pencil makes mistakes easier to correct and gives you more control while you’re still building muscle memory.
Gel eyeliner offers a middle ground between pencil and liquid. Using an angled or fine-tip brush for controlled application, and warming up the product slightly by rubbing it on the back of your hand first, gives gel liner a smoother, more workable texture. Gel delivers richer pigment and a more defined line than pencil while remaining more forgiving than liquid.
Liquid eyeliner delivers the sharpest, most precise lines and the most intense color payoff, but it also has zero margin for error once applied making it the most advanced option. A brush-tip pen formula makes wings significantly easier for those newer to liquid liner, since the firm tip offers more control than a traditional brush.
General prep tip Always prime your eyelids and set with translucent powder to prevent smudging, regardless of which formula you choose. Using an eyeshadow primer before applying eyeliner and setting your liner with a matching eyeshadow afterward significantly extends wear time, especially for anyone with oily eyelids or who lives in a humid climate a waterproof formula is also worth considering in those conditions.
Since a polished eye look almost always pairs eyeliner with mascara, if you’re also rebuilding your everyday eye makeup routine, our guide to the best drugstore mascaras for everyday use covers the top affordable picks that complete the look once your liner is set.
How to Apply Eyeliner Line: Step-by-Step
Step 1 — Start With a Clean, Prepped Lid
Apply a thin layer of eyeshadow primer across your lid before reaching for your liner. This single step does more for longevity than any other part of the process it prevents the natural oils in your eyelid from breaking down the product throughout the day.
Step 2 — Anchor Your Line at the Lash Base
Begin at the inner corner of your eye, working in small, short strokes rather than attempting one long continuous line. Keep the liner thin near the inner corners and gradually thicken the lines as you reach the end this graduated thickness is what gives a basic eyeliner line its polished, professional appearance rather than a flat, uniform stripe.
Step 3 — Work in Small Connected Strokes
Instead of one long line, draw small, connected strokes for better control. This is especially important for anyone with an unsteady hand short strokes are dramatically easier to correct than a single sweeping motion, and they reduce the chance of an uneven, shaky result.
Step 4 — Apply With Eyes Open When Possible
For certain eye shapes particularly hooded eyes apply eyeliner with your eyes open so you can see exactly where the line will sit once your eye is in its natural resting position. This prevents the common mistake of drawing a beautiful line that completely disappears once you open your eyes and the hood of skin covers it.
Step 5 — Clean Up With Concealer
Use concealer on a small brush to clean up any wobbly lines or sharpen your wing edges. This technique gives you professional-looking results without starting over completely it’s the single most useful correction trick for beginners and professionals alike.
Step 6 — Set Your Liner
Setting your eyeliner with a matching eyeshadow patted gently over the top helps it last longer and prevents smudging throughout the day particularly valuable for pencil and gel formulas that are more prone to transferring than liquid.
How to Master Winged Eyeliner
The winged liner sometimes called a cat eye is the most requested eyeliner look and consistently one of the most frustrating to master. The encouraging truth: winged eyeliner is not about talent. It is a learned skill built through repetition, technique, and patience, and most beginners need 10 to 20 attempts to feel comfortable and consistent.
The Dot-and-Connect Method
If your hand shakes or you’re new to wings entirely, try the dot-and-connect method: dot along your wing shape, then slowly connect the dots rather than attempting one continuous sweeping stroke. You can also use a small piece of tape angled from your outer corner as a guide for a clean edge genuinely effective training wheels for a first attempt.
Finding the Right Angle
The key to a winged eyeliner look that complements your face lies in finding the right angle for your eye shape. Look straight ahead in the mirror and imagine a line from your lower lash line extending upward this is your wing direction. Aim the wing toward the end of your eyebrow for a natural lift that doesn’t look forced or disconnected from the rest of your eye shape.
Building the Wing
Start by creating a small dot where you want your wing to end, then draw a line from this dot back down to your upper lash line, filling in the resulting triangle shape. Connect this wing to your main eyeliner line, ensuring smooth transitions between the two so there’s no visible break or mismatch in thickness.
Practice Strategy
Practice strokes on the back of your hand before committing to your actual eyelid this lets you get a feel for your specific eyeliner’s texture and flow without the pressure of getting it right on your face the first time. Sketching the wing shape using eyeshadow first, then going over it with liner, is another effective beginner strategy that allows for easy correction before you commit to a harder-to-remove product.
Progress from pencil to gel to liquid as your confidence builds pencil and gel are far more forgiving for mistakes, while liquid should be reserved until you’ve built genuine muscle memory with the angle and motion.
How to Tightline Your Eyes
Tightlining is one of those subtle techniques that makes a significant difference without looking like obvious “eyeliner” at all. It involves applying eyeliner directly to your upper waterline the thin strip of skin just beneath your upper lashes.
By filling in this space, you create the illusion of fuller, thicker lashes and a more defined eye shape, all without a visible line on the lid. It’s perfect for no-makeup makeup days or whenever you want a polished, defined look without the visible drama of a full winged liner.
To tightline effectively, gently pull your upper lid up and slightly back to expose the waterline, then use small, controlled dabs (rather than a dragging motion) with a pencil liner to fill the gaps between your upper lashes. A waterproof or smudge-proof formula is strongly recommended here, since the inner eye area is more prone to watering and transfer than the outer lid.
Eyeliner Techniques by Eye Shape
This is where most eyeliner tutorials fall short and where understanding your specific eye shape changes everything about your results. Here’s a complete breakdown:
Round Eyes
This technique helps add length and balance to round eyes. Start your liner at the center of your upper lash line and gradually thicken it toward the outer corner, finishing with a soft, slightly extended wing that flicks just past the outer corner. Wider flicks can elongate the look beautifully, helping counteract the natural roundness of the eye shape.
Hooded Eyes
Apply eyeliner with your eyes open so you can see exactly where the line will sit, since a hood of skin can completely cover a line drawn with eyes closed. Keep the liner thin at the inner corner, then gently lift upward at the outer edge for a subtle, eye-opening effect. Focus on thin, precise lines through the outer two-thirds of the eye to avoid overwhelming the lid a classic cat eye or winged eyeliner generally works best for this eye shape.
Monolid Eyes
Keep eyeliner thin and close to the lashes for soft, subtle definition, since a monolid has less natural crease structure to work with. Set it with a powder to prevent transfer, and finish with a small upward wing. An exaggerated winged look tends to work particularly well on monolid eyes, since it adds the visual structure and lift that the eye shape doesn’t naturally have.
Almond Eyes
Almond eyes are the most forgiving shape most techniques work well here, so focus primarily on balance and symmetry between both eyes rather than a specific corrective technique. Start at the inner corner and work outward to the outer corner to create a lifted, elongated effect, and consider a slightly thicker line on the outer corner to further emphasize the natural almond shape. Floating crease eyeliner is a particularly flattering technique for this shape.
Downturned Eyes
Downturned eyes benefit from slightly upward-angled liner that lifts the outer corners. Start your wing from the outer third of your eye and angle it upward more aggressively than you would for other eye shapes this directly counters the natural downward slope and creates a more lifted overall appearance.
Wide-Set Eyes
Apply a clean eyeliner line with a short upward wing, keeping the focus on definition rather than extending the line dramatically outward, which can emphasize the distance between the eyes further.
Close-Set Eyes
Minimize liner near the inner corners and emphasize the outer wing instead. Starting your eyeliner from the middle of the eye, rather than the inner corner, visually creates more space between the eyes and balances the proportion.
Small Eyes
Small eyes look larger with lighter colors on the waterline and slightly thicker liner on the upper lash line. Avoid heavily lining the entire lower lash line and avoid lining the waterline with dark colors, as both choices can make eyes appear visually smaller and more closed-off.
Common Eyeliner Mistakes and How to Fix Them
Uneven wings — The most common frustration for beginners. Fix by matching the angle of one wing first, then adjusting the smaller wing to match rather than trying to perfect both simultaneously from the start.
Smudging throughout the day — Usually caused by oily lids or not setting the liner properly. Always prime first, set with powder or matching eyeshadow after, and consider switching to a waterproof formula if you have naturally oily eyelids or live somewhere humid.
Shaky or wobbly lines — Practice strokes on the back of your hand before applying to your actual lid, and use the dot-and-connect method rather than attempting one continuous sweeping line. Relaxing your face and blinking naturally (rather than holding your eye tightly open or shut) also significantly improves line control.
Liner disappearing on hooded eyes — Always apply with eyes open for hooded lids, since closed-eye application frequently results in a beautifully drawn line that’s completely invisible once the eye opens.
Eyeliner for Different Makeup Looks and Occasions
Your eyeliner approach should shift depending on the overall look you’re going for:
Natural, everyday makeup: A thin tightlined upper waterline or a soft, barely-there line along the lash base. Skip the dramatic wing entirely, or keep it extremely subtle.
Casual and formal subtle looks: Natural, winged, or reverse-winged liners work well here defined but not overpowering, appropriate for office settings and daytime events.
Bold party or evening makeup: Graphic liner and floating crease eyeliner styles are ideal for making more of a statement, since evening lighting and the occasion itself call for more drama than daytime wear.
Formal and special occasion looks: A more intense, defined wing sometimes paired with lining both the upper and lower waterlines works beautifully for events where you want serious visual impact, similar to the intensity often seen in Arabic eyeliner styles, which focus on strong lines that highlight the natural eye shape with both waterlines defined and a sharp outer wing.
For long-wear occasions where smudging is a real concern weddings, all-day events, humid climates pairing your eyeliner with a genuinely waterproof formula on top makes a significant difference. If that’s a priority for your routine, our breakdown of the best waterproof mascaras that actually last all day covers the formulas that hold up alongside a long-wearing liner.
Final Tips for Eyeliner Success
Mastering eyeliner is genuinely a skill built through repetition rather than natural talent and the timeline for most people is more forgiving than it feels in the moment. Most beginners need 10 to 20 attempts before a winged look feels comfortable and consistent, and even experienced makeup lovers continue refining their technique over time.
Choose one method and stick with it consistently rather than jumping between dramatically different techniques every attempt muscle memory develops through repetition, not perfection. Start with a forgiving formula like pencil or gel, master the basic line and a simple wing, then graduate to liquid liner and more advanced looks like tightlining and graphic styles once your foundational control is solid.
The single most important principle across every eye shape and every technique: tailor your approach to your specific eyes rather than copying a tutorial built for a different shape entirely. Understanding your eye shape and adjusting your technique accordingly is what separates eyeliner that looks effortlessly polished from eyeliner that looks like it’s fighting against your natural features.