
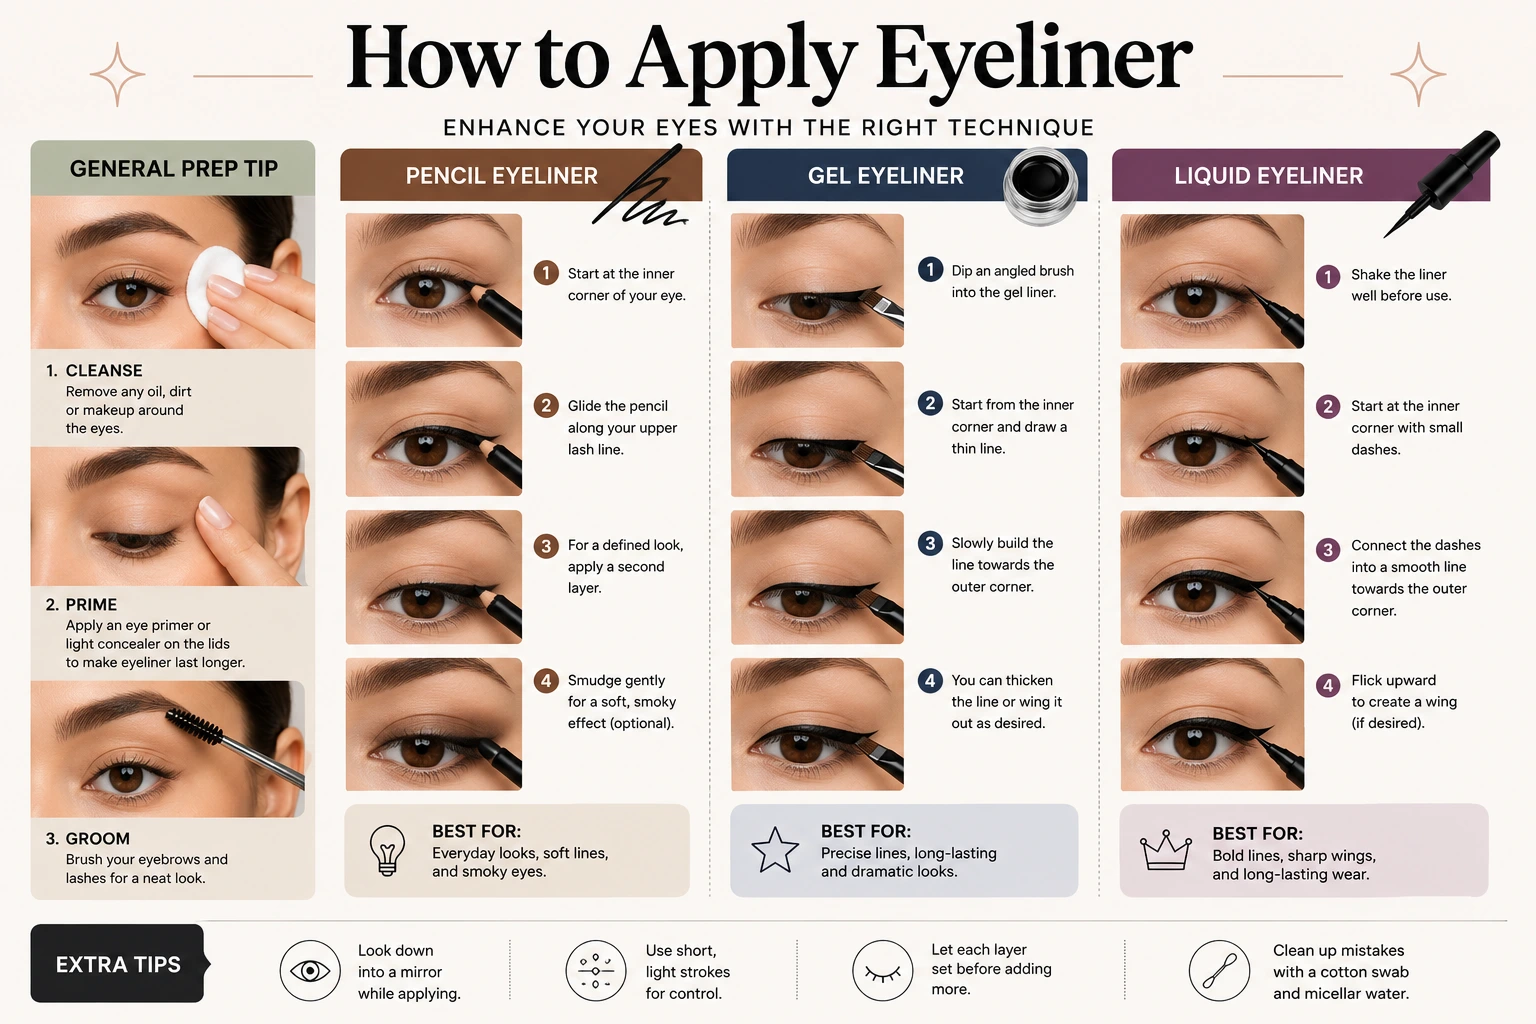
If you want the short answer: apply eyeliner in small, connected strokes starting close to your lash line, building from thin at the inner corner to thicker at the outer corner, then adjust the exact placement and technique based on your eye shape.
That single sentence gets you 80% of the way there. The rest of this guide covers the part that actually determines whether eyeliner looks effortless or fights against your face where exactly to place it, which technique suits your eye shape, and how to fix it when it goes wrong.
By RK Fashion Zone Editorial Team | A dedicated team researching and writing about modern fashion, beauty products, and practical outfit guides.
How to Apply Eyeliner Step by Step
1. Prep your eyelids
Swipe a thin layer of eyeshadow primer across your lid before you pick up your liner. This is the step most people skip, and it’s the one that most affects how long your liner actually lasts — primer keeps natural oils from breaking the product down over the course of the day.
2. Choose the right eyeliner
Pencil is the most forgiving for a first attempt because you can build up color gradually and correct as you go. Gel and liquid give sharper, more saturated lines but leave less room for error. If you’re still building confidence, start with pencil or gel.
3. Find a comfortable position
Rest your elbow on a flat surface rather than holding your arm up unsupported — this alone removes most of the shake that causes wobbly lines. Look into a mirror at a slight downward angle rather than tilting your head back.
4. Start close to the lash line
Begin at the inner corner and place the liner as close to the base of your lashes as possible, right along the lash line itself. A gap here is what creates the look of “floating” liner separated from your lashes.
5. Use short strokes instead of one long line
Draw in small, connected strokes rather than attempting to drag one continuous line from corner to corner. Short strokes are dramatically easier to keep straight, and if one section goes wrong, you’re only fixing a few millimeters instead of the whole line.
6. Build thickness gradually
Keep the line thin near the inner corner and let it thicken slightly as you move toward the outer corner. This graduated thickness is what makes a basic liner line look intentional rather than flat and uniform.
7. Shape the outer corner
At the outer corner, decide whether you want the line to simply taper off naturally along the lash line or extend slightly upward. This decision sets up whether you’re doing a classic line or moving into a wing.
8. Create a wing if desired
If you want a wing, use the natural angle of your lower lash line as a guide — imagine extending that line upward and slightly beyond your outer corner. Start with a shorter wing than you think you want; you can always extend it.
9. Connect and fill the wing
Draw a short line from the tip of your wing back down to meet your upper lash line, then fill in the small triangle this creates. Blend the connection point so there’s no visible seam between the wing and the main line.
10. Clean up mistakes
Dip a small angled brush or cotton swab in makeup remover to sharpen edges and fix any wobbles. A thin layer of concealer applied with a small brush along the bottom edge of your liner is the single most effective correction trick — it sharpens the line without forcing you to remove and redo it.
11. Check both eyes for symmetry
Step back from the mirror and look at both eyes at once rather than working on one fully before starting the other. Small differences are much easier to catch and correct in the middle of the process than after both sides are finished.
Where Should You Apply Eyeliner?
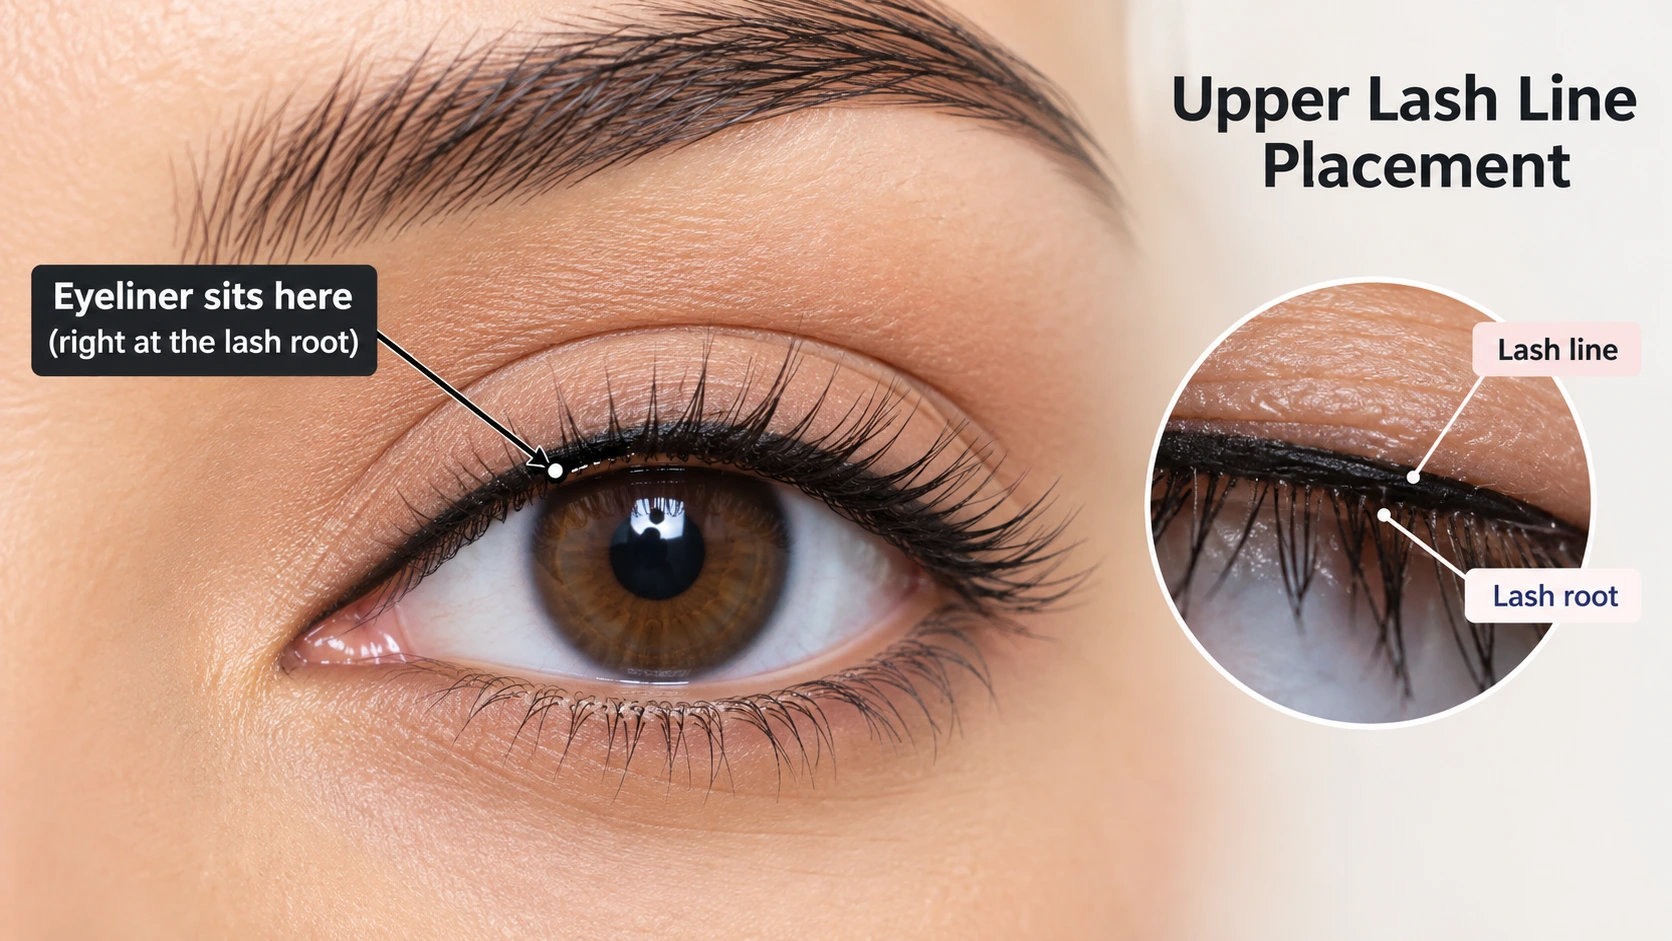
This is genuinely a different question than “how do you apply eyeliner,” and it’s worth answering directly because the placement changes the entire effect.
- Upper lash line — the most common placement, applied directly along the base of your top lashes. This is the foundation of nearly every eyeliner look, from subtle to dramatic.
- Outer corner — where a wing extends beyond the natural end of your eye. This is what creates lift and the classic cat-eye effect.
- Lower lash line — applied along the base of your bottom lashes, usually with a lighter hand than the upper line to avoid closing the eye up visually.
- Waterline — the inner rim of your eyelid, between your lashes and the white of your eye. Lining the upper waterline is sometimes called tightlining (see below); lining the lower waterline with dark colors can make eyes look smaller, while lighter shades can brighten them.
- Tightlining — technically a technique, not just a location, but it’s worth defining here since it answers a lot of “where does eyeliner go” confusion. It means filling in the upper waterline and the tiny gaps between your upper lashes, which makes lashes look fuller without a visible drawn line on the lid.
A quick safety note on the waterline: this area is close to your eye and more sensitive than the lid. Use a formula labeled safe for waterline use, avoid sharing eyeliner with others, and stop immediately if you experience irritation. If you wear contact lenses, apply eyeliner after inserting them, and check with an eye care professional if you have any ongoing eye sensitivity.
How to Apply Eyeliner for Beginners
If you’ve never applied eyeliner before, skip the wing entirely for your first several attempts. Use a soft pencil, and instead of trying to draw one clean top-lash-line stroke, use small dots placed right at the base of your lashes, then connect them into a line. This removes almost all of the pressure that causes a shaky hand, and it’s far easier to add more than to remove excess pencil once it’s on.
Practice the motion on the back of your hand first so you know how the product glides before it touches your eyelid. Once a simple, thin line along your upper lash line feels comfortable, you can start experimenting with thickness and, eventually, a wing.
How to Apply Different Types of Eyeliner
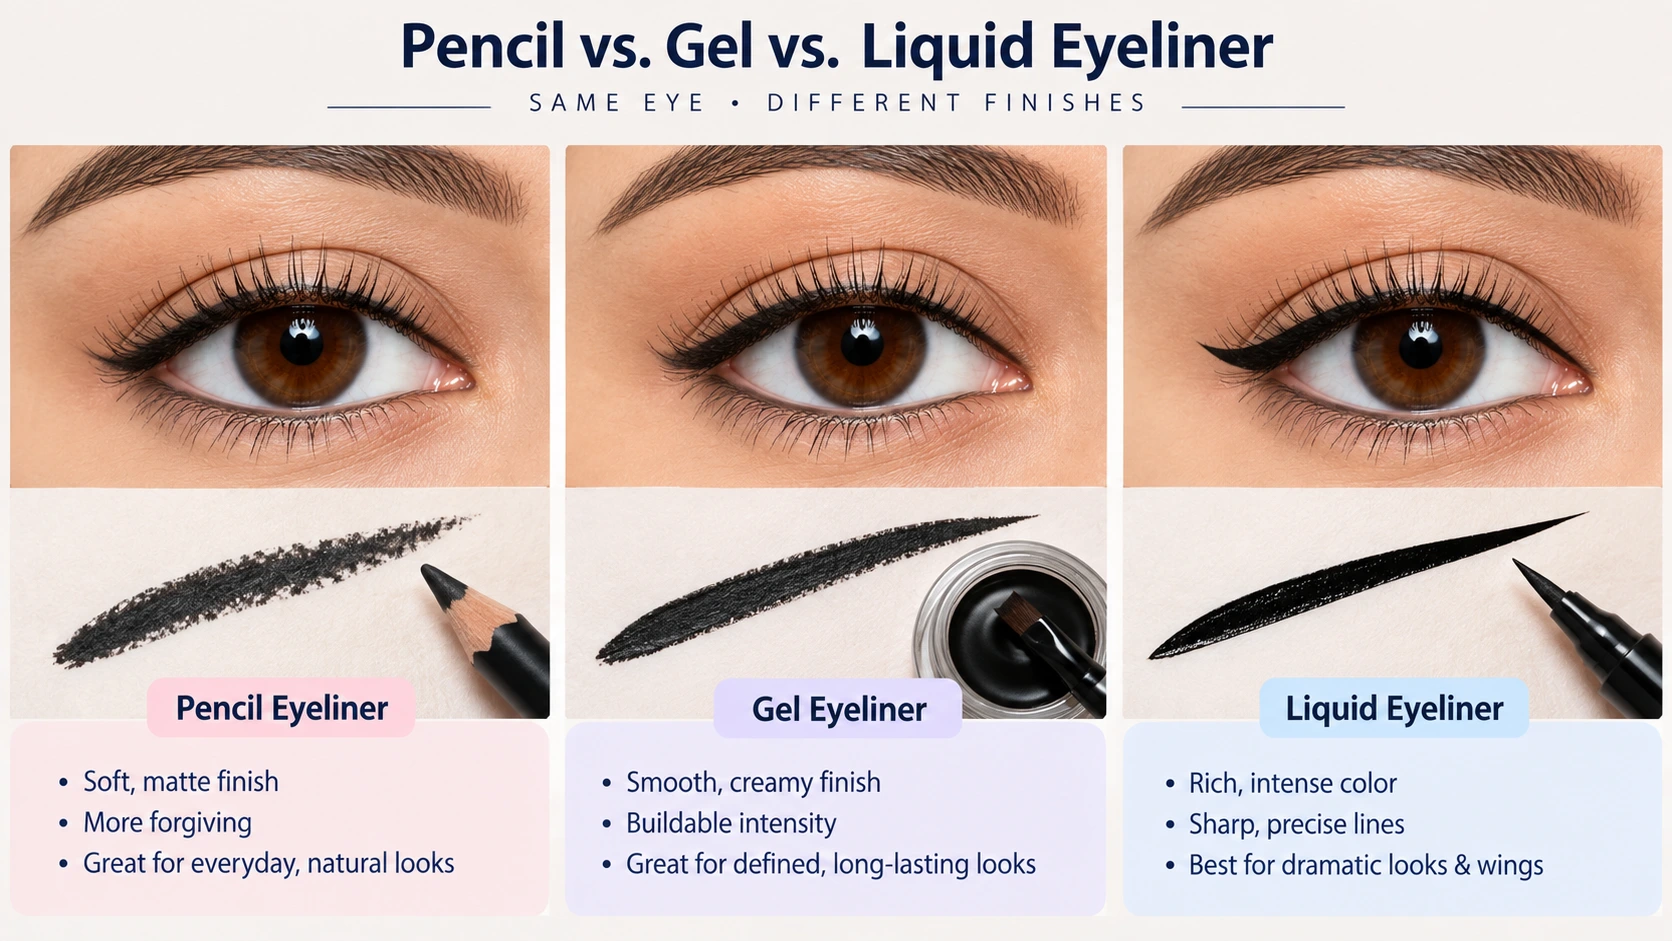
Pencil eyeliner goes on with light, short strokes since the softer tip can drag if you press too hard. It’s the easiest formula to correct mid-application and the best starting point if you’re new to eyeliner.
Liquid eyeliner requires the steadiest hand and the least room for error, since it dries quickly and doesn’t blend once set. Steady your elbow, use short strokes rather than one sweep, and build the line in thin layers rather than trying to get full opacity in one pass. For a deeper breakdown of formulas and techniques, our guide to applying liquid eyeliner like a pro covers pen-tip versus brush-tip application in more detail.
Gel eyeliner sits between pencil and liquid warm the product slightly before applying (many people rub the applicator on the back of their hand first) and use an angled brush for control. It delivers richer color than pencil with more forgiveness than liquid. If you want to go deeper on why gel works well for both subtle and dramatic looks, see our gel eyeliner guide.
Felt-tip or pen eyeliner applies similarly to a marker, which makes wings noticeably easier for beginners since the firm tip offers more control than a liquid brush. It’s a good middle step between pencil and traditional liquid liner.
If smudging or fading throughout the day is your main concern regardless of formula, our picks for the best waterproof eyeliner breaks down which formulas actually hold up through long days, humidity, or watery eyes.
How to Apply Eyeliner for Different Eye Shapes
No single technique is correct for every eye shape what looks balanced on one shape can look different on another. These are practical starting points, not rules.
- Almond eyes are generally the most flexible shape. Most techniques work well here, so focus on symmetry between both eyes rather than a corrective approach.
- Round eyes often look more elongated with a line that starts thin at the center of the lid and thickens toward the outer corner, finished with a soft, extended flick.
- Hooded eyes benefit from applying with your eyes open, since a fold of skin can hide a line drawn with eyes closed. Keep the line thin through the inner two-thirds and lift slightly at the outer corner.
- Monolids often look best with liner kept thin and close to the lashes, since there’s less natural crease to define the shape a small upward wing at the outer corner adds structure.
- Downturned eyes can look more lifted with a wing that angles upward more sharply than usual, starting from the outer third of the eye.
- Upturned eyes already have a natural lift, so a straighter line along the lash base without an aggressive upward wing usually keeps the look balanced rather than overly dramatic.
How to Apply Eyeliner Under the Eyes
Lower lash line and under-eye application is its own skill, separate from the upper line, and it’s easy to overdo.
For the lower lash line, use a lighter hand than you would on top. Start about a third of the way in from the outer corner rather than running the line all the way to the inner corner, which can make eyes look smaller and more closed off.
For the lower waterline, dark colors can visually shrink the eye, while nude or light pencil shades along this area can actually make eyes look more open and awake. If you’re going for a soft, everyday look, a light waterline pencil is often more flattering than a dark line on the lower lash line.
Whichever you choose, avoid lining both the lower lash line and the lower waterline with dark liner at the same time unless you’re deliberately going for a bold, smoky effect combined, they tend to overwhelm the eye rather than define it.
Easy Eyeliner Techniques to Try
- Classic liner — a single clean line along the upper lash line, no wing.
- Tightline — liner filled into the upper waterline for a fuller-lash effect with no visible drawn line.
- Soft/smudged liner — liner applied then gently blended with a small brush or cotton swab for a diffused, smoky effect.
- Winged liner — the classic cat-eye extension at the outer corner.
- Puppy eyeliner — a wing that angles slightly downward rather than upward, for a softer, more rounded lift.
- Subtle everyday liner — a thin line, often just tightlined or barely-there along the lash base, for a no-makeup-makeup look.
- Bold liner — a thicker line, sometimes extended along both upper and lower waterlines, for a stronger evening look.
How to Apply Winged Eyeliner
Wings intimidate more beginners than any other eyeliner technique, but the process breaks down into a few manageable decisions.
Choose your wing direction first. Look straight ahead and imagine extending a line from your lower lash line upward and outward that’s roughly the angle your wing should follow. Aiming it toward the tail of your eyebrow usually creates a natural-looking lift.
Create the outer guideline. Make a single short line at the angle you chose, starting from just past your outer corner. Keep it shorter than you think you want on your first attempt.
Connect it to the lash line. Draw a second short line from the tip of that guideline back down to meet your upper lash line, forming a triangle.
Fill the shape. Color in the triangle you’ve created, then go back over the connection point where the wing meets the main line to smooth out any visible seam.
Correct uneven wings by matching the smaller or less defined wing to the better one, rather than trying to perfect both sides from scratch. Adjust length and angle on the weaker side using small strokes until the two look balanced when you view both eyes at once.
Common Eyeliner Mistakes and How to Fix Them
- Line too thick — soften the top edge with a clean angled brush and a touch of concealer, then rebuild only where needed.
- Uneven lines — fix in short strokes rather than trying to erase and redraw the whole line at once.
- Shaky hands — rest your elbow on a surface, use short connected strokes, and practice the motion on the back of your hand first.
- Eyeliner transferring to the eyelid — set with a matching eyeshadow or translucent powder, and consider a waterproof formula if you have oily lids.
- Uneven wings — match the smaller wing to the larger one instead of adjusting both simultaneously.
- Gaps between liner and lashes — apply the first stroke as close to the lash root as possible, then tightline underneath if gaps persist.
- Liner disappearing on hooded eyes — apply with eyes open, not closed, so you can see where the line sits once your eye is in its natural resting position.
- Smudging throughout the day — prime first, set after, and switch to a waterproof formula for humid conditions or naturally oily lids.
- Using too much product — build thickness in thin layers rather than applying one heavy pass, especially with liquid or gel formulas.
Eyeliner Tips for a Cleaner, More Even Result
- Rest your elbow on a table or counter a stabilized arm removes most shake before it starts.
- Pull your eyelid taut with one finger while applying, especially for liquid liner, so the skin doesn’t shift under the tip.
- Do one thin layer at a time rather than trying to achieve full color and thickness in a single stroke.
- Keep a cotton swab dipped in makeup remover nearby for instant corrections rather than starting over.
- Apply eyeliner before eyeshadow if you’re going for a soft, blended look, or after if you want a crisp line on top of your shadow — both orders work, and the right choice depends on the finish you want.
- Blink naturally rather than holding your eye wide open or squeezed shut while you work; a relaxed eyelid gives a more accurate placement.
Frequently Asked Questions
Where should eyeliner be applied?
Most commonly along the upper lash line, as close to the base of the lashes as possible. From there, placement expands to the lower lash line, the waterline, or the outer corner depending on the look you want.
Should eyeliner go above or below the lashes?
For most everyday looks, eyeliner sits directly at the base of the upper lashes, essentially on the lash line itself rather than clearly above or below it. A small gap above the lashes creates a “floating” look some people use intentionally for a graphic style.
Is eyeliner supposed to go on the waterline?
It can, but it’s optional. Lining the waterline (called tightlining on the upper waterline) adds definition without a visible line on the lid. It’s a personal preference, not a required step.
What is the easiest eyeliner for beginners?
A soft pencil eyeliner is generally easiest, since it allows for gradual buildup and easy correction while you’re still building control.
Should I apply eyeliner before or after eyeshadow?
Both orders are used. Applying before eyeshadow allows you to blend the liner into a soft, smoky finish; applying after gives a crisper, more defined line on top of your shadow.
How do I stop eyeliner from smudging?
Prime your eyelid before application, set the liner with a matching eyeshadow or translucent powder afterward, and switch to a waterproof formula if you have oily eyelids or live somewhere humid.
How do I make both eyeliner wings even?
Perfect one wing first, then use it as the reference to adjust the other, rather than trying to get both sides exactly right at the same time.
How do I apply eyeliner to hooded eyes?
Apply with your eyes open so you can see where the line will actually sit once your eye is in its natural resting position, and keep the line thin through the inner two-thirds of the eye.
How do I apply eyeliner under my eyes?
Use a lighter hand than on the upper lash line, and consider starting the line about a third of the way in from the outer corner rather than running it the full length, which helps avoid making the eye look smaller.
What is the easiest eyeliner technique?
A simple, thin line along the upper lash line with no wing is the easiest technique to start with it teaches basic control before adding the complexity of a wing or waterline work.



2 Comments
[…] application rather than long, dragging strokes carry over directly from the technique used with eyeliner application, if you want a deeper technique breakdown of that shared skill […]
[…] line drawn with eyes closed can end up entirely hidden under the hood once your eyes open. Our full eyeliner application guide covers general technique in depth, but the hooded-eye-specific adjustment is worth repeating […]