Few beauty products promise as much and deliver as inconsistently as liquid eyeliner. Done right, it gives you the sharpest, most defined line of any eyeliner formula a precise, graphic finish that pencil and gel simply cannot replicate. Done wrong, it’s smudged, uneven, and one of the most frustrating products in any makeup bag. The difference almost always comes down to two things: the formula you’re using and the technique behind your application.
What Makes Liquid Eyeliner Different
Liquid eyeliner delivers the sharpest, most precise lines and the most intense color payoff of any eyeliner formula, but it also has zero margin for error once applied making it the most advanced eyeliner type to master. Unlike pencil or gel, which can be smudged, blended, or corrected mid-application, liquid liner dries down quickly into a set line that’s difficult to adjust once it’s on.
That precision is exactly why liquid liner remains the gold standard for graphic looks, sharp wings, and any eye makeup style where a clean, unbroken edge matters most. The tradeoff for that precision is control liquid formulas require a steadier hand and more practice than other eyeliner types, which is why so many people default to pencil or gel while building confidence before graduating to liquid.
The applicator matters enormously here too. A brush-tip pen formula makes wings significantly easier for those newer to liquid liner, since the firm tip offers more control than a traditional liquid-and-brush pot, where the brush itself can be unpredictable depending on how much product it’s holding.
What to Look for in a Good Liquid Eyeliner
Not all liquid eyeliners are created equal, and the difference between a frustrating product and a genuinely great one usually comes down to a handful of formula and applicator characteristics.
Applicator tip type. A flexible felt-tip applicator is one of the most reliable formats for achieving both thin and thick lines in a single product the flexibility lets you control line weight just by adjusting the angle and pressure you apply, rather than needing separate products for fine detail work versus bold lines.
Formula finish. Look for a smudge-proof formula that dries quickly to a true matte finish. A liner that takes too long to set is more likely to transfer or smear before it has the chance to lock in place, especially around the lash line where blinking creates constant friction.
Waterproof performance. If longevity matters to you and for most people, it does a genuinely waterproof formula is non-negotiable. The best liquid liners hold up through sweat, humidity, tears, and even water exposure without flaking or running, giving you all-day wear without touch-ups.
Control and skip-free application. A smooth-flowing tip that applies pigment without any skips is what separates a liner that glides cleanly along the lash line from one that drags, catches, or leaves patchy gaps that require multiple passes to fix.
Ingredient profile. Many people now look for vegan, cruelty-free, and talcum-free formulas as a baseline standard. These attributes don’t affect performance, but they matter increasingly to buyers who want their beauty routine to align with broader values.
If you’re working on building out a complete, foundational eye makeup routine, our full step-by-step guide on how to apply eyeliner covers the broader techniques across pencil, gel, and liquid formulas useful context before zeroing in on liquid liner specifically.
How to Apply Liquid Eyeliner: Step-by-Step
Step 1 — Prep Your Lid
Apply a thin layer of eyeshadow primer across your eyelid before reaching for your liner. This step does more for longevity than almost anything else in the process, since it prevents natural oils from breaking down the product and causing it to slip or smudge throughout the day.
Step 2 — Shake the Product Well
With the cap secured, shake the eyeliner well before use to ensure a smooth-flowing formula and application. Skipping this step is one of the most common reasons liquid liner applies unevenly straight out of the tube separated or settled pigment leads to patchy, inconsistent color in your first few strokes.
Step 3 — Start Thin at the Inner Corner
Apply lightly along the lash line for a thin line, gently increasing pressure to achieve a bolder line as desired. Working from thin to thick rather than trying to draw a uniformly bold line in one passgives you significantly more control and makes correcting your angle or thickness mid-line much easier.
Step 4 — Work in Small, Connected Strokes
Rather than attempting one long, continuous sweep across your entire lash line, draw the line in small connected segments. This dramatically reduces the chance of a shaky or uneven result, especially for anyone still building confidence with a liquid formula.
Step 5 — Build the Wing With a Guide
For a winged look, dot where you want the wing to end, then connect that dot back to your main lash line, filling in the resulting triangle shape. Many people find it easier to sketch the wing shape with an eyeshadow first, then trace over it with liquid liner this lets you correct the angle before committing to a product that’s much harder to remove once set.
Step 6 — Let It Set Before You Blink Normally
Because liquid eyeliner dries down quickly to a matte finish, give it a few seconds to fully set before closing your eyes completely or rubbing the area. Touching it too soon is one of the most common causes of smudged or transferred liner, even with a genuinely smudge-proof formula.
Step 7 — Clean Up the Edges
Use a small, precise concealer brush dipped in concealer to clean up any wobbly lines or sharpen your wing’s edge. This single trick is what separates amateur liquid liner application from a clean, professional-looking finish it lets you fix minor imperfections without starting the entire line over.
Liquid Eyeliner by Eye Shape
Choosing the right technique for your specific eye shape makes liquid liner significantly more flattering and easier to apply consistently.
Hooded eyes — Apply with your eyes open so you can see exactly where the line will sit once your eye returns to its natural resting position, since a hood of skin can completely conceal a line drawn with your eyes closed. Keep the line thin through the inner two-thirds of the eye and let it lift gently at the outer corner.
Round eyes — Start your liner at the center of the upper lash line and gradually thicken it toward the outer corner, finishing with a soft, extended wing. This elongates the eye shape and adds the structure that round eyes naturally lack.
Monolid eyes — Keep the line thin and close to the lash line for subtle definition, then finish with a small, defined upward wing an exaggerated wing tends to work particularly well here, since it adds the visual lift and structure that monolids don’t naturally have.
Downturned eyes — Angle your wing more aggressively upward than you would for other eye shapes, starting the lift from the outer third of the eye. This directly counters the natural downward slope and creates a more lifted overall appearance.
Almond eyes — The most forgiving shape for liquid liner. Almost any technique works well here, so focus on symmetry between both eyes rather than a specific corrective approach.
Common Liquid Eyeliner Problems and How to Fix Them
Patchy or skipping lines. Usually caused by a formula that’s drying out or not shaking the product enough before use. Make sure to shake well before every application, and replace your liner if it’s been open longer than 3–6 months, since liquid formulas can dry out over time even with the cap on.
Uneven wings. Perfect the angle and shape of one wing first, then use it as your template for matching the second one, rather than trying to perfect both sides simultaneously from scratch.
Smudging throughout the day. This typically points to one of two issues: oily eyelids breaking down the product, or not giving the liner enough time to fully set before touching the area. Prime your lid beforehand, and resist the urge to blink hard or rub your eyes immediately after application.
Liner disappearing on hooded eyes. Always apply with your eyes open if you have hooded lids drawing a beautiful, precise line with your eyes closed often results in a line that’s completely invisible once your eye opens and the natural hood covers it.
Shaky, unsteady lines. Practice on the back of your hand first to get a feel for the specific liner’s flow and pressure sensitivity before committing to your actual eyelid. Working in small, short connected strokes rather than one long sweep also dramatically improves control for unsteady hands.
How to Choose the Right Liquid Eyeliner for You
With dozens of liquid eyeliner formulas on the market, narrowing down the right one comes down to a few key priorities.
If you’re new to liquid liner: Look for a formula with a firm, brush-tip pen-style applicator rather than a traditional pot-and-brush format the firmer tip gives beginners significantly more control while building confidence with the technique.
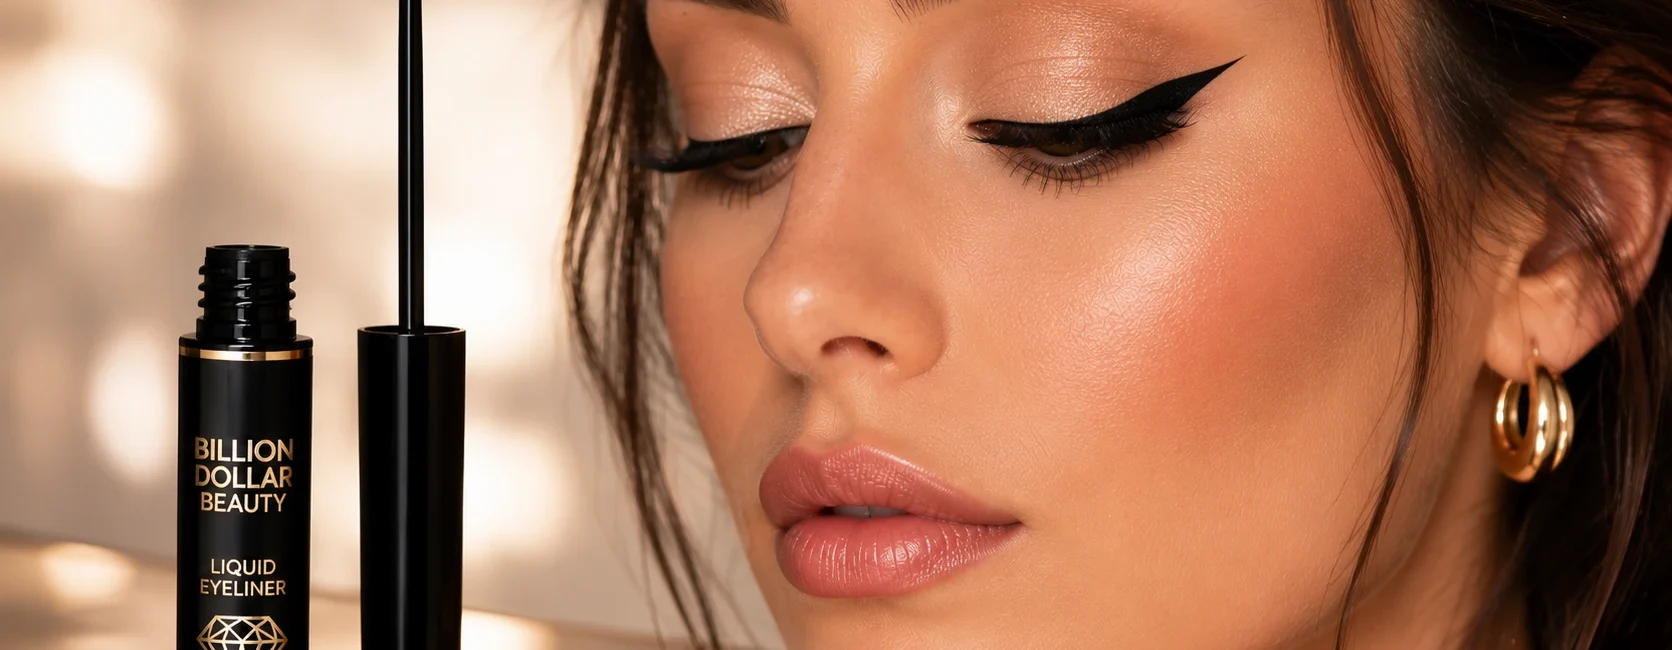
If longevity is your top priority: Choose a genuinely waterproof, smudge-proof formula. One well-reviewed option in this category is the Billion Dollar Beauty Liquid Eyeliner, which uses a flexible felt-tip applicator designed to create both thin and thick lines from a single pen, with a fast-drying matte finish built to resist smudging, sweat, and water exposure throughout the day. It’s also vegan and cruelty-free, with consistently high ratings from users who specifically praise its waterproof performance and precision tip for clean, controlled lines.
If you have oily eyelids: Prioritize a waterproof formula above all else oily lids are the single biggest factor in eyeliner breaking down and transferring throughout the day, regardless of how carefully you apply it.
If you want maximum line control: Choose a felt-tip or brush-pen applicator over a traditional liquid pot. The firmer, more predictable tip structure makes it dramatically easier to achieve both fine detail lines and bolder, more dramatic strokes from the same product.
Final Thoughts: Mastering Liquid Eyeliner
Liquid eyeliner remains one of the most rewarding and most commonly mismastered products in any makeup routine. The difference between a flawless, graphic line and a smudged, uneven mess almost always comes down to formula quality and consistent technique rather than natural talent. Choose a liner with a reliable, flexible applicator tip and genuinely waterproof, smudge-proof performance, prep your lid properly before application, build your line in small, controlled strokes, and give the product time to set before touching the area.
With the right product and a bit of practice, liquid eyeliner becomes one of the fastest, most transformative steps in any eye makeup look capable of taking a simple, natural face from understated to genuinely striking in a matter of seconds.