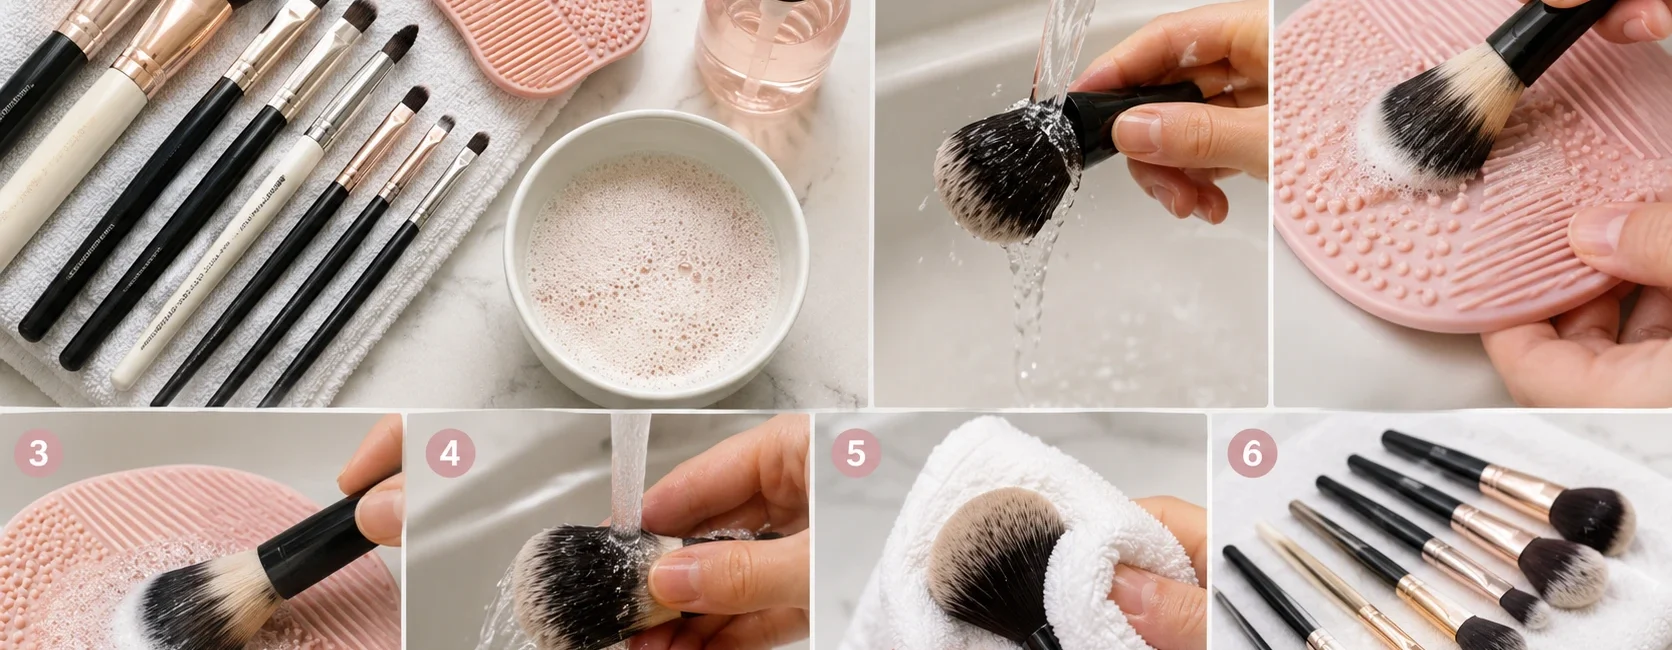
Quick answer: Wet only the bristles of your brush under lukewarm running water, never the handle or base, work a small amount of gentle cleanser (baby shampoo, a dedicated brush soap, or a mild dish soap) into the bristles in circular motions, rinse until the water runs completely clear, gently reshape the bristles, and lay the brush flat to air dry with the bristles hanging slightly off the edge of a counter. Foundation and concealer brushes should be cleaned every few days; eye and powder brushes can go about a week between washes.
Most people clean their makeup brushes far less often than they should, and it’s not really about vanity or hygiene squeamishness. Dirty brushes genuinely change how makeup performs and can meaningfully affect skin health. Every time a brush touches your face, it picks up oil, dead skin cells, and leftover product, which then sits on the bristles and becomes exactly the kind of environment bacteria thrive in. That buildup is also why a foundation that applies smoothly on day one starts looking patchy and muddy by week three, even though nothing about the product itself has changed.
By Rehan Khatri | Fashion & Beauty Writer at RK Fashion Zone.
Why Cleaning Your Brushes Actually Matters
Beyond the obvious hygiene factor, dirty brushes cause two separate problems. The first is skin-related: bacteria, oil, and dead skin cells transferred back onto your face with every application can contribute to clogged pores, breakouts, and in rarer but genuinely serious cases, skin infections. The second is purely about makeup performance: buildup on bristles prevents smooth, even blending, dulls true color payoff, and can make even a well-formulated product look cakey or streaky by the time it’s applied.
How Often You Should Actually Be Washing Your Brushes
The right frequency depends on what the brush touches, since liquid and cream products (foundation, concealer) build up faster and harbor more bacteria than dry powder products do.
- Foundation and concealer brushes: every few days, ideally every other use, since these come into the most direct, repeated contact with skin and liquid product.
- Eye makeup brushes: about once a week, more often if you’re prone to eye irritation or infections, since the eye area is especially sensitive to bacterial buildup.
- Powder brushes (blush, bronzer, setting powder): roughly once a week is generally sufficient, since dry powder products don’t harbor bacteria as readily as creams and liquids.
- A full, thorough deep clean of every brush, regardless of type, is worth doing at least once a month, even for tools you clean regularly in between, to fully clear out any residue that builds up over repeated quick cleans.
What You’ll Need
- A gentle cleanser: baby shampoo, a dedicated solid or liquid brush soap, a clarifying shampoo, or a mild antibacterial dish soap
- Lukewarm water (never hot, which can damage bristles and loosen the glue holding them in place)
- A silicone brush-cleaning mat or pad (optional, but genuinely helpful for breaking down stubborn buildup faster)
- A clean, dry towel
How to Clean Makeup Brushes, Step by Step
1. Gather every brush, including ones you haven’t used recently. Unused brushes sitting in a makeup bag or on a counter still collect dust, dirt, and bacteria from their surroundings, so they need regular cleaning too, not just the ones in daily rotation.
2. Wet only the bristles, angled downward, under lukewarm running water. This is the single most important technique detail across every reliable source on this topic. Keep the handle and the ferrule (the metal band connecting the bristles to the handle) as dry as possible; soaking that connection point repeatedly weakens the glue over time and can eventually cause bristles to shed or the brush head to loosen entirely.
3. Apply a small amount of cleanser to your palm or a silicone cleaning mat. A few drops of baby shampoo, a dedicated brush soap, or a mild dish soap all work well. Avoid regular bar soap or harsh hand soap, both of which tend to dry out and damage natural bristles over repeated washes.
4. Gently swirl the brush in the cleanser using circular motions. Work the lather through the bristles thoroughly but gently, more of a massage than a scrub, focusing on getting cleanser fully through the bristle base where product tends to accumulate most, not just the visible tips.
5. Rinse thoroughly under running water until it runs completely clear. This is the clearest sign the brush is actually clean rather than just surface-rinsed. For heavily used or product-caked brushes, this may take a full minute or more, and that’s normal, not a sign you’re doing something wrong.
6. Repeat if the water isn’t running clear yet. Certain formulas, particularly silicone-based foundations and long-wear cream products, cling to bristles more stubbornly and often need a second full cleaning pass. This is especially common with brushes used for full-coverage or long-wear bases; our full guide to applying concealer covers several of the heavier, longer-wear formulas most likely to need this extra step.
7. Gently squeeze out excess water without tugging or pulling on the bristles. A clean, dry towel works well here; press rather than wring.
8. Reshape the bristles back to their original form while the brush is still slightly damp, since this is much harder to correct once fully dry.
9. Lay brushes flat to dry, with the bristles hanging slightly off the edge of a counter or table, never standing upright in a cup. Drying upright lets water run down into the ferrule and handle, which can loosen the glue and cause mildew to develop inside the handle over time, a problem you often won’t notice until it’s already caused damage.
10. Give brushes several hours to fully air dry, longer for denser, larger brushes like powder or foundation brushes. Many people find it easiest to do a full brush cleaning at night so everything is fully dry and ready to use again by morning.
Cleaning Makeup Sponges
The same general soap-and-rinse method applies to makeup sponges (like a Beautyblender), with one key difference: sponges absorb far more product and water than brush bristles do, so they require more thorough, patient squeezing throughout the rinse process to release trapped soap and residue fully. Skipping this step and using a still-soapy sponge can leave a filmy residue on skin at your next application.
Quick-Clean Between Full Washes
For anyone who doesn’t have time for a full wash between every use, a quick spritz of a brush cleaner containing roughly 60 to 70 percent alcohol is a genuinely effective way to remove surface product and reduce bacteria between deeper cleans, particularly for cream and liquid product brushes used daily. This isn’t a substitute for the full wash method above, but it meaningfully extends how long a brush stays hygienic and performs well between deep cleans. Avoid anything much higher than 70 percent alcohol; it tends to dry out too quickly to actually disinfect effectively and can be harsher on bristles over repeated use.
Common Brush-Cleaning Mistakes to Avoid
Soaking the whole brush head or handle. This is the single most common way people accidentally shorten their brushes’ lifespan, since prolonged water exposure at the ferrule breaks down the glue holding the bristles in place.
Using hot water. Heat can warp bristles, particularly on natural-hair brushes, and can also affect the glue at the base more than lukewarm water does.
Drying brushes upright in a cup. As covered above, this lets water seep into the handle and ferrule, risking both mildew and structural damage over time.
Assuming one rinse is enough for heavily used brushes. Especially with silicone-based, long-wear, or full-coverage cream products, a single pass often isn’t sufficient. If the water isn’t running clear, the brush isn’t clean yet, regardless of how it looks on the surface.
Skipping brushes you rarely use. As covered above, unused brushes still collect dust and environmental buildup, and using a “clean but dusty” brush on your face defeats much of the purpose of regular cleaning.
Building Brush Cleaning Into Your Routine
Since foundation, concealer, powder, and blush brushes all need slightly different cleaning frequency, it helps to think of brush care as part of the same routine as the products themselves. If you’re using multiple tools regularly, our guides to applying concealer, the Maybelline Fit Me setting powder, and the Maybelline Sunkisser matte blush all involve brushes that benefit from the specific cleaning frequency guidance above, since liquid, powder, and cream products each build up differently on bristles. And if primer is part of your base routine, our primer buying guide is worth pairing with clean tools, since even the best primer performs poorly when applied with a product-caked brush or sponge.
Frequently Asked Questions
How often should I really be washing my makeup brushes?
Foundation and concealer brushes benefit from cleaning every few days, ideally every other use. Eye and powder brushes can generally go about a week between washes, with a full deep clean of every brush at least once a month.
Can I use dish soap to clean makeup brushes?
Yes, a mild, gentle dish soap works well and is a common recommendation, including from professional makeup artists, particularly for cutting through heavier cream or long-wear formulas. Avoid harsher antibacterial hand soaps or bar soap, which can dry out and damage bristles over repeated use.
Why does my brush still feel dirty after washing it once?
Certain formulas, especially silicone-based foundations and long-wear products, cling to bristles more stubbornly and often need a second full wash to release fully. This is normal and not a sign you’re cleaning incorrectly.
Is it bad to let makeup brushes air dry standing up?
Yes. Drying brushes upright allows water to run down into the ferrule and handle, which can loosen the glue holding the bristles in place and create conditions for mildew inside the handle over time.
Do I need special makeup brush cleaner, or will shampoo work?
A gentle shampoo, particularly a clarifying or baby shampoo, works perfectly well and is a widely recommended alternative to specialized brush cleansers. A dedicated brush soap can offer a slightly more thorough clean for heavily used brushes, but isn’t strictly necessary.
Can dirty makeup brushes actually cause skin infections?
Yes, in more serious cases. Dirty brushes can harbor bacteria capable of causing skin infections, including fungal infections and, rarely, more serious bacterial infections. If you notice persistent breakouts or irritation that seems tied to your makeup routine, it’s worth both improving brush hygiene and consulting a dermatologist if the issue continues.
Final Thoughts
Clean makeup brushes aren’t just a hygiene nicety; they genuinely change how your makeup applies, how long it lasts, and how your skin responds to daily wear. The full method takes only a few minutes per brush: wet only the bristles, cleanse gently, rinse until clear, reshape, and dry flat. Building it into a regular weekly or biweekly habit protects both your skin and the investment you’ve made in your makeup tools. Once it’s part of the routine, it stops feeling like a chore and starts being as automatic as washing your face.