
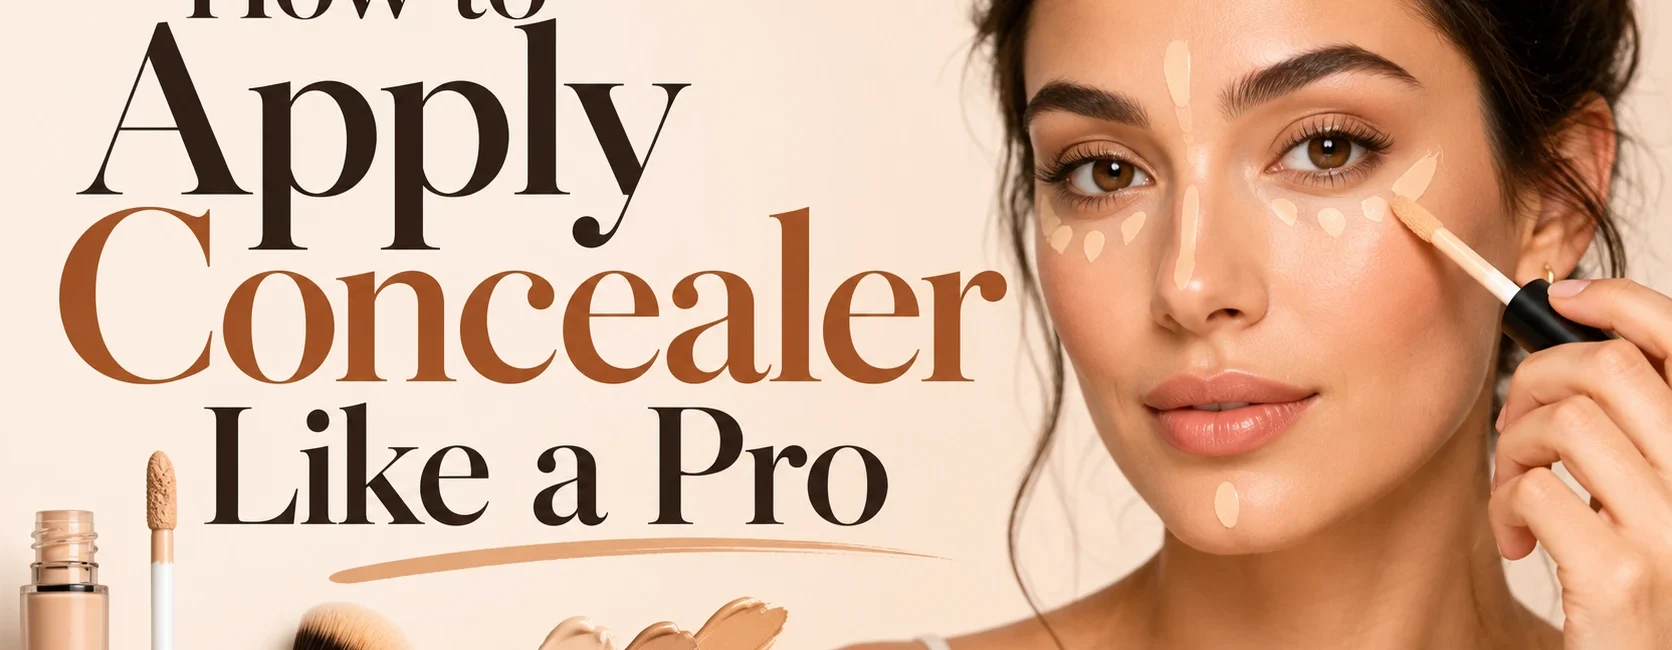
Concealer is one of the most transformative products in any makeup routine, and also one of the most commonly misapplied. Cakey texture under the eyes, a concealer shade that oxidizes orange by noon, or coverage that creases into every fine line by lunchtime; these are almost never a product problem. They’re almost always a technique problem. The right shade, the right tools, and the right application method make the difference between concealer that looks airbrushed and concealer that looks like makeup sitting on top of skin.
By Rehan Khatri | Fashion & Beauty Writer at RK Fashion Zone.
Choosing the Right Concealer Shade and Formula
Before technique matters, shade and formula selection make or break the final result.
For under-eye brightening, choose a shade one to two shades lighter than your foundation. This creates the brightening, “wide-awake” effect most people want under the eyes. Going more than two shades lighter creates an obvious, chalky contrast instead of a natural brightening effect.
For blemish and spot coverage, match your concealer as closely as possible to your actual skin tone, not lighter. A lighter shade over a blemish draws more attention to it rather than camouflaging it.
Formula matters as much as shade. Liquid concealers are the most versatile and buildable, suited to nearly every skin type and concern. Cream concealers (often in a pot or stick) offer heavier coverage and work well for well-hydrated or normal-to-dry skin. Full-coverage or “high-coverage” formulas are best reserved for larger areas of redness or discoloration, since they can look heavy and obvious when used only under the eyes in small amounts.
Consider your skin type. Dry or mature skin generally looks better with a hydrating, dewy-finish concealer, since matte formulas can settle into fine lines and emphasize dryness. Oily or acne-prone skin benefits from a matte or long-wear formula that resists shifting or sliding throughout the day.
What You’ll Need
- Your chosen concealer (color-matched as above)
- A color corrector, if addressing specific redness, dark circles, or discoloration (optional, covered below)
- A damp makeup sponge (like a beauty blender) or a small, dense concealer brush
- Setting powder, ideally a translucent or banana powder for under-eyes
- A small fluffy brush for powder application
Step 1: Prep Your Skin First
Concealer applies more smoothly and lasts significantly longer over well-prepped skin. Cleanse, moisturize, and let your moisturizer fully absorb before starting, since applying concealer over unabsorbed moisturizer causes it to slip and slide throughout wear. If your skin runs dry or you deal with dullness, a hydrating serum underneath your moisturizer, like our recommended glow serum, helps concealer sit more smoothly rather than clinging to dry patches.
A lightweight, focused primer over the under-eye area and any spots you plan to conceal heavily also extends wear time and helps prevent creasing later in the day. Our primer buying guide breaks down which formulas work best depending on your skin type and concern.
Step 2: Color-Correct First, If Needed
Color correcting isn’t necessary for everyone, but it makes a real difference for specific, stubborn concerns that a standard concealer shade alone won’t fully neutralize.
- Orange or peach corrector neutralizes blue or purple-toned dark circles, the most common under-eye concern.
- Green corrector neutralizes redness from blemishes, rosacea, or irritation.
- Yellow corrector neutralizes mild purple or blue discoloration and brightens sallow-toned skin.
- Lavender or purple corrector counteracts yellow or dull, sallow undertones.
Apply color corrector in a thin layer only where needed, then let it set for a few seconds before layering concealer on top. Using color corrector everywhere, rather than only on the specific area of concern, creates an uneven, patchy final result.
Step 3: How to Apply Concealer Under the Eyes
Draw a triangle, not a crescent. Rather than applying concealer only in a thin line directly under the lash line, extend it into a triangle shape with the base along the lower lash line and the point extending toward the top of the cheekbone. This lifts and brightens a much larger area of the under-eye, rather than just masking the darkest central point.
Use a damp sponge for the most natural finish. A slightly damp makeup sponge presses and bounces concealer into the skin rather than dragging or rubbing it, which prevents both product wastage and the creasing that comes from disturbing the skin’s fine texture. If you prefer more precise, buildable coverage, a small, dense concealer brush works well too, followed by a light pat with a damp sponge to blend the edges.
Less is more, applied in thin layers. One thick layer creases far more than two or three thin, well-blended layers. Build coverage gradually rather than trying to fully camouflage in a single pass.
Blend outward and downward, following the natural contours of the face, rather than rubbing side to side, which can move product into fine lines rather than smoothing it into the skin.
Step 4: Conceal Blemishes and Spots
Apply directly onto the blemish with a small, precise brush rather than a sponge, which gives you more control and prevents spreading product (and potentially bacteria) to surrounding clear skin.
Pat, don’t rub. Gently pat the concealer into place with a clean fingertip or the flat side of a brush. Rubbing can irritate an active blemish and drag product away from the exact spot you’re trying to cover.
Set immediately with a light dusting of powder directly over the spot. This locks the concealer in place and significantly improves how long spot coverage lasts throughout the day, since blemishes are often in areas prone to more oil production and movement (like the chin or around the nose).
Step 5: Color-Correct and Conceal Redness
For broader areas of redness (across the cheeks, around the nose, or general rosacea-related flushing), apply a thin layer of green corrector first, focusing only on the reddest areas rather than the whole face. Follow with your regular foundation or a lightweight concealer blended over the top with a damp sponge, using light, bouncing motions rather than dragging strokes that can reactivate irritation.
Step 6: Set Your Concealer Properly
Setting is the single most overlooked step, and it’s the main reason concealer creases by midday.
Under the eyes, use a fluffy brush to press a small amount of translucent or banana powder into the skin, focusing on the areas most prone to creasing (the inner corner and just below the lash line). Let the powder sit for 60 to 90 seconds before dusting away any excess; this “baking” technique allows the powder to fully absorb any excess moisture and oil before you continue with the rest of your makeup.
Over blemishes and spot concealing, a light, targeted dusting of powder is enough; heavy powder in these areas can actually emphasize texture rather than smoothing it.
Avoid over-powdering. Too much powder anywhere on the face, especially under the eyes, can look cakey and actually draw more attention to fine lines rather than smoothing them out. A light touch, reapplied later in the day if needed, works better than one heavy initial application.
Common Concealer Mistakes and How to Fix Them
Creasing under the eyes. Almost always caused by applying too much product in one layer, skipping the setting step, or using a formula that’s too heavy or dry for your under-eye skin type. Apply in thin layers, set with powder, and consider switching to a more hydrating formula if creasing persists.
Concealer turning orange or ashy throughout the day. This is an oxidation issue, common with certain liquid formulas reacting to skin’s natural oils over several hours. Choosing a formula labeled long-wear or oxidation-resistant, and setting thoroughly with powder, both help minimize this.
Visible demarcation lines. Usually caused by not blending the edges of the concealer into the surrounding skin and foundation. Always blend outward with a slightly damp sponge to soften the transition between concealed and unconcealed skin.
Concealer looking cakey or heavy. Typically a sign of applying too much product, using a formula too matte or thick for your skin type, or skipping proper skin prep beforehand. Building thin layers and prepping skin well beforehand both solve this.
Concealer settling into texture or fine lines. A hydrating primer and a lighter-weight formula both help here, along with genuinely thin application layers rather than one heavy pass.
How Concealer Fits Into Your Full Face Routine
Concealer typically comes after foundation (to touch up and brighten specific areas) or before foundation for spot-concealing blemishes, depending on your preferred method and coverage needs. Once your concealer is set, a light dusting of setting or finishing powder, like our reviewed Maybelline Fit Me powder, locks everything in place for the rest of the day.
From there, blush and bronzer add warmth and dimension back to a fully concealed complexion, since heavy coverage can sometimes flatten natural color; our review of the Maybelline Sunkisser matte blush is a good next step if you’re building out a complete base routine. And if you’re finishing the whole face, our guide to applying eyeliner is a natural next step for completing the eye area once your concealer work is done.
How to Remove Concealer Properly at Night
Sleeping in makeup, including concealer, is one of the most common causes of clogged pores and breakouts, particularly in areas where concealer is applied heavily, like under the eyes or over blemishes. A proper cleansing balm breaks down long-wear and full-coverage formulas far more effectively than a water-based cleanser alone; our roundup of the best cleansing balms covers the top-performing options for fully removing a heavy makeup day without stripping or irritating skin.
Frequently Asked Questions
Should concealer be lighter or the same shade as my skin?
For under-eye brightening, one to two shades lighter than your foundation works best. For covering blemishes or spots, match your actual skin tone as closely as possible rather than going lighter.
Do I apply concealer before or after foundation?
Either order works. Applying concealer after foundation lets you see exactly what still needs coverage, which uses less product overall. Applying before foundation works well for spot-concealing specific blemishes that need targeted coverage.
Why does my concealer crease under my eyes?
Creasing is usually caused by applying too much product at once, skipping the setting step, or using a formula too heavy for your skin type. Apply in thin layers and set with a light dusting of powder for 60 to 90 seconds before blending away excess.
What’s the best tool for applying concealer?
A damp makeup sponge gives the most natural, blended finish for under-eye application. A small, dense brush offers more precision for spot-concealing blemishes. Many people use both: a brush for placement, a sponge for blending.
How do I stop my concealer from turning orange?
This is usually an oxidation issue with certain liquid formulas. Choose a long-wear or oxidation-resistant formula, and always set thoroughly with powder to help minimize the shift in color throughout the day.
Can I use concealer without foundation?
Yes. Many people use concealer alone, sometimes called “no-foundation” or “skin tint” makeup, to spot-correct specific areas like under-eyes or blemishes while leaving the rest of the skin bare or lightly covered with a tinted moisturizer.
Final Thoughts
Great concealer application comes down to a handful of consistent habits: choosing the right shade and formula for your specific concern, prepping skin properly beforehand, applying in thin, buildable layers rather than one heavy pass, and setting thoroughly to prevent creasing. Master these fundamentals, and concealer becomes one of the fastest, most reliable ways to look genuinely rested and put-together, no matter how the rest of your day is going.


2 Comments
[…] This is especially common with brushes used for full-coverage or long-wear bases; our full guide to applying concealer covers several of the heavier, longer-wear formulas most likely to need this extra […]
[…] and a fresher overall eye area are part of your goal alongside the liner itself, our guide to concealer application covers technique that pairs naturally with any of the liner styles above for a more finished […]